TL;DR
The cabinet installation process is the full sequence of work that transforms flat-packed or pre-assembled cabinet boxes into a functioning kitchen or bathroom. It spans five phases: pre-installation prep, assembly (for RTA cabinets), core installation, sequencing, and post-installation finish work. About 30% of installation errors trace back to bad measurements, and fixing mistakes costs $3,000 to $12,000 on average. This glossary defines every term you’ll encounter across those phases so you can communicate clearly with installers, set accurate client expectations, and spot problems before they become expensive.
The internet is full of step-by-step cabinet installation tutorials. This is not one of them.
Instead, this is a reference guide built around the terminology professionals actually use during the cabinet installation process. Whether you’re a contractor coordinating trades, a dealer explaining project scope to a client, or a homeowner trying to understand what you’re paying for, knowing these terms puts you in control of the conversation.
Every term below is grouped by installation phase so you can follow the logical flow of a project from site survey through final punch list. The definitions apply to both kitchen and bath cabinet installations.
Planning your next project? Explore contractor cabinet pricing and lead times to align sourcing with your install schedule.
What Is the Cabinet Installation Process?
The cabinet installation process is the sequence of steps used to prepare a space, assemble cabinets when necessary, secure and level cabinet boxes, align doors and drawers, and complete final adjustments. It typically includes site measurement, delivery inspection, cabinet assembly, wall and base cabinet installation, trim work, hardware adjustment, and a final quality inspection. The exact sequence depends on cabinet type, room conditions, and project scope.
Cabinet Installation Process at a Glance
Most cabinet installation projects follow these stages:
Site preparation: Measure the room, inspect walls and floors, verify appliance dimensions, and confirm plumbing and electrical rough-ins.
Delivery inspection: Check cabinet sizes, finishes, hardware, and components before installation begins.
Cabinet assembly: Assemble ready-to-assemble (RTA) cabinets according to the manufacturer’s instructions.
Layout and leveling: Establish reference lines, locate suitable wall framing, and account for uneven floors and walls.
Cabinet mounting: Secure cabinets using the specified mounting points and appropriate fasteners.
Alignment and trim: Connect adjacent cabinets, install fillers and panels, and fit decorative trim where required.
Final adjustments: Adjust doors and drawers, install hardware, complete approved sealing work, and inspect the finished installation.
Countertop templating and appliance installation are coordinated with cabinet installation but may be performed by separate trades.
Cabinet Installation Terms: Quick Reference
Term | Meaning | When It Is Used |
|---|---|---|
Site survey | Inspection and measurement of the installation space | Before ordering or installing cabinets |
Rough-in | Preliminary plumbing and electrical work | During renovation preparation |
High point | Highest area of the floor along the cabinet run | When establishing base cabinet height |
Reference line | A level horizontal line used to guide cabinet placement | During layout and installation |
Ledger board | Temporary support for positioning wall cabinets | During upper cabinet mounting |
Shimming | Using suitable shims to correct uneven surfaces and alignment | During leveling |
Plumb | Vertically aligned | When checking cabinet sides and faces |
Level | Horizontally aligned | When checking cabinet tops and runs |
Filler strip | Material used to close a gap beside a cabinet | During fitting and finishing |
Scribing | Trimming a panel or filler to match an uneven surface | During finish work |
Toe kick | Recessed space at the bottom of a base cabinet | During base cabinet finishing |
Face frame | Structural frame attached to the front of a framed cabinet box | During cabinet connection and alignment |
Countertop template | Measurement pattern used to fabricate a countertop | After base cabinets are secured |
Punch list | List of incomplete or defective items requiring correction | During final inspection |
Use this table as a quick reference, then consult the relevant glossary entry for the full explanation and installation considerations.
Section A: Pre-Installation Terms
Before a single cabinet touches a wall, a series of preparation steps determines whether the rest of the installation goes smoothly or falls apart. Roughly 30% of installation errors in large-scale projects stem from inaccurate measurements, making this phase the most consequential.
Site Survey
Measuring walls, floors, and ceilings for high points, low points, and out-of-square conditions before any cabinets arrive. This is the foundation of the entire cabinet installation process. A site survey identifies problems (bowed walls, sloping floors) that would otherwise surface mid-install when fixes are expensive.
Common mistake: Assuming walls are straight and floors are level. As one industry source puts it, “floors and walls are often not even, which means cabinets will not be straight” (Express Kitchens).
For a detailed walkthrough, see our guide on how to measure kitchen cabinets.
Rough-In
The plumbing and electrical work completed behind walls before cabinets go up. This includes water supply lines, drain positions, electrical outlets, and under-cabinet lighting wiring. Cabinets cannot be installed until rough-ins pass local inspection. Note that cabinet installation scope typically excludes plumbing and electrical work, so these trades need to be coordinated separately by a general contractor.
Layout Plan
The drawn design showing exact cabinet positions, sizes, appliance clearances, and filler locations. In trade workflows, this often comes as a 2020 Design file. The layout plan prevents guessing during install and serves as the contract between designer, supplier, and installer.
High Point (Floor)
The highest spot on the floor where base cabinets will sit. This spot becomes the reference for leveling every other cabinet in the run. All other base cabinets shim up to this point. Miss it, and your countertop will slope.
Stud Location
Finding and marking the wall framing members, typically spaced 16 inches on center. Cabinets mount into studs, not drywall. This is non-negotiable for wall cabinets carrying dishes, glasses, and heavy cookware. Professional contractor Mike Holmes puts it bluntly: “without proper support, it’s all too easy for your cabinets to collapse” (Holmes / HGTV).
Dry Fit
Placing cabinets in position without fastening them to confirm fit, alignment, and clearances. This catches measurement errors before screws go in. Skipping a dry fit is like skipping a spell check before printing: the mistakes are still there, just harder to fix.
Delivery Inspection
Opening every box on arrival and checking for damage, wrong sizes, missing parts, or finish defects. Skipping this step is one of the top contractor mistakes cited across industry sources. Document everything with photos before assembly begins.
See our full cabinet delivery checklist for a printable reference.
Materials Compliance (CARB Phase 2 / TSCA Title VI)
Federal and state standards governing formaldehyde emissions from composite wood products. Cabinets meeting CARB Phase 2 and EPA TSCA Title VI compliance support indoor air quality requirements and code compliance. This matters on any project requiring permitting documentation or IAQ certification.
Section B: Assembly Terms (RTA Cabinets)
Many trade projects use RTA cabinets to manage costs and timelines. Understanding these assembly terms clarifies what happens between delivery and the actual cabinet installation process on the wall.
RTA (Ready-to-Assemble)
Cabinets shipped flat-packed with pre-drilled panels, hardware, and instructions. They’re assembled on-site (or in a shop) before installation. RTA cabinets cost 20 to 50% less than pre-assembled cabinets, and assembly takes 15 to 45 minutes per unit depending on experience.
For a full breakdown, read RTA vs. assembled cabinets.
Cam Lock
A rotating disc connector that pulls two cabinet panels tight together. You insert a dowel or bolt into one panel, then the cam in the adjacent panel rotates to lock them flush. Cam locks are the primary mechanical fastener in most RTA cabinet systems.
Dowel Joint
Wooden pins inserted into pre-drilled holes to align and strengthen panel connections. Dowels work alongside cam locks or glue to keep box geometry square during assembly.
Pre-Assembled Cabinet
A factory-built cabinet box that arrives ready for immediate wall or floor mounting. No on-site assembly labor required, but costs run 20 to 50% higher than RTA equivalents. Some suppliers offer RTA cabinets with optional assembly services, letting you pick up units next day (unassembled) or wait roughly a week for shop assembly. Assembly and measurement video resources from your supplier can significantly reduce errors during this phase.
Section C: Core Installation Terms
These are the terms you’ll hear repeatedly during the physical cabinet installation process. They apply whether you’re mounting wall cabinets, setting base units, or building an island.
Reference Line (Level Line)
A horizontal line snapped with a chalk line or projected with a laser level on the wall. It marks where cabinet tops or bottoms will align. Everything references this line. If it’s wrong, every cabinet is wrong.
Ledger Board
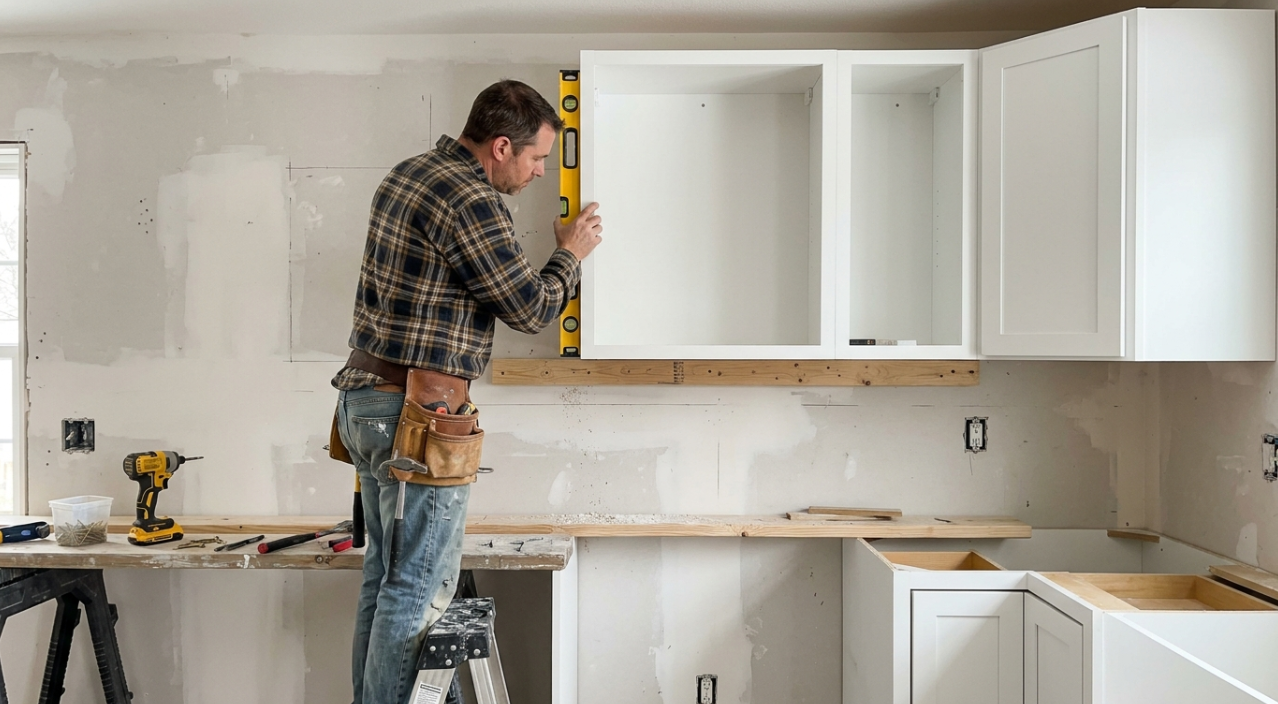
A temporary support board screwed to wall studs at the reference line height. It holds upper cabinets in place during mounting so the installer doesn’t have to support 50+ pounds overhead while driving screws. Practitioners on the WOODWEB Cabinet Installation Forum consistently call a “cabinet jack” or “third hand” device the tool that separates smooth installs from a struggle. A ledger board serves the same purpose with less specialized equipment.
Shimming
Inserting thin, tapered wedges to level and plumb cabinets against uneven walls and floors. Forum members on Garage Journal emphasize the maxim “more shims is more better,” recommending shimming at top, middle, and bottom of each cabinet, as well as front, middle, and back. That level of shimming detail is what separates a cabinet run that looks straight from one that gradually drifts out of alignment.
Plumb
Perfectly vertical. Checked with a level on the cabinet face, side to side. A cabinet can be level (horizontal) but not plumb (vertical), and both must be correct.
Level
Perfectly horizontal. Checked along the top of the cabinet front to back and side to side. Even slight deviations affect door operation and countertop fit.
Screw-to-Stud
Driving cabinet mounting screws through the nailer rail (the solid strip across the back of the cabinet box, typically 3/4 inch thick) and into wall studs. The nailer rail, also called a hanging rail or mounting rail, runs the full width of the cabinet and is the only structural connection point.
For more on how the nailer rail and box panels work together, see our cabinet box construction guide.
Cabinet Mounting to Wall Framing
Cabinet mounting involves securing wall cabinets to suitable wall framing or an approved structural support system using fasteners specified for the cabinet and wall construction. Installers identify the framing, verify the cabinet’s designated mounting points, and use appropriate screws or other approved hardware. Drywall alone should not be treated as sufficient structural support for loaded wall cabinets.
The cabinet back, hanging rail, mounting rail, and other attachment points vary by cabinet design. Follow the cabinet manufacturer’s installation instructions and account for the wall material, cabinet load, and required clearances. Where the existing framing or wall condition does not provide suitable support, an appropriate reinforcement or mounting solution may be necessary.
Connecting Framed and Frameless Cabinets
Framed cabinets have a face frame at the front of the cabinet box. When adjacent units are joined, installers align and clamp the frames before fastening them together at the manufacturer’s designated connection points. Pilot holes and appropriate fasteners help reduce the risk of splitting or damaging the material.
Frameless cabinets do not have a projecting face frame. Adjacent units are typically aligned and connected through their cabinet sides using suitable fasteners and the manufacturer’s specified joining method. Fastener length, diameter, placement, and drilling depth depend on panel thickness and cabinet construction.
In both systems, connections must hold the cabinets in alignment without damaging the finished surfaces or interfering with doors, drawers, and internal hardware. Do not assume that a single screw length or fastening pattern is appropriate for every cabinet system. Pilot holes should be pre-drilled into the face frames to prevent the natural wood from splitting.
Cabinet-to-Cabinet Connection (Frameless)
For frameless cabinets, adjacent boxes join through the side panels using shorter screws (usually 1-1/4 inch maximum). This shallow anchoring may require more screw locations to achieve the same rigidity as a face frame connection.
Filler Strip
A strip of matching material used to fill the gap between a cabinet and a wall, appliance, or adjacent run. Fillers compensate for walls that aren’t perfectly straight and for the dimensional gaps that accumulate across a long cabinet run.
Scribe / Scribe Molding
Trimming a filler or panel on-site to match the contour of an irregular wall or ceiling. Scribe molding is a thin, trimmable strip fitted to close that gap cleanly. Scribing is one of the skills that separates a professional-quality cabinet installation process from a rough one.
Toe Kick
The recessed base at the bottom of base cabinets. Installed after cabinets are set and leveled. The toe kick covers the gap between the cabinet bottom and the floor, hiding shims and giving the base a finished look.
Section D: Installation Sequence Terms
The order of operations matters as much as the techniques. Getting the sequence wrong creates cascading problems. For a broader view of how cabinet installation fits into a full remodel, see our kitchen remodel timeline.
Uppers First (Wall Cabinets First)
The most common professional approach: installing wall cabinets before base cabinets. This avoids the awkwardness and risk of working over base units to reach the wall. Some methods reverse this order, but the majority of trade pros prefer uppers first.
Corner Cabinet Start
Installation begins at the corner and works outward in both directions. The corner unit sets the reference for all adjacent cabinets. If the corner cabinet is out of plumb or level, the error compounds down the entire run.
Base Cabinet Installation
Setting floor units using shims from the high point of the floor outward, then securing to wall studs. Base cabinet installation takes approximately 30 to 40% of the total installation timeline. This phase demands patience because every base unit must be level and aligned before countertops can be templated.
Wall Cabinet Installation
Lifting and mounting upper boxes onto the ledger board, checking plumb at each unit, and screwing into studs. Professional tool kit discussions on WOODWEB consistently highlight multiple levels (6-foot, 4-foot, 2-foot, and torpedo) plus an impact driver as the non-negotiable core tools for this step.
Island Installation
Securing an island cabinet assembly to the subfloor. Islands don’t attach to walls, so they require different anchoring, typically cleats or brackets screwed through the subfloor into floor joists. Plumbing and electrical rough-ins for islands need to be completed before the subfloor goes down.
Crown Molding / Trim-Out
Decorative trim applied after cabinets are installed to close gaps at the ceiling and give the kitchen a finished appearance. Crown molding installation is part of the trim-out phase, which also includes light rail molding under wall cabinets and any decorative end panels.
Countertop Template
A precise outline created after base cabinets are fully installed, leveled, and secured. Stone or quartz fabricators use this template to cut material to fit. The template cannot be made until cabinets are in final position, which is why rushing base installation leads to countertop delays.
Looking for a reliable cabinet supplier? Compare trade supplier options that offer fast assembly turnarounds to keep your install schedule on track.
What Is Included in Cabinet Installation?
Cabinet installation generally covers positioning, leveling, securing, aligning, and finishing the cabinet units. The precise scope depends on the contractor’s agreement, cabinet supplier, and project requirements.
Task | Typically Included in Cabinet Installation? | Important Consideration |
|---|---|---|
Checking cabinet deliveries | Often | Report damage and missing components promptly |
Assembling RTA cabinets | Depends on the contract | Assembly may be priced separately |
Leveling and securing cabinets | Yes | Requires suitable mounting points and fasteners |
Connecting adjacent cabinets | Yes | The method depends on cabinet construction |
Installing fillers and end panels | Often | Confirm the trim and finishing scope |
Installing cabinet pulls and knobs | Depends on the contract | Hardware may be supplied or installed separately |
Countertop templating and fabrication | Usually separate | Generally follows final cabinet positioning |
Plumbing and electrical connections | Usually separate | Coordinate licensed or qualified trades as required |
Appliance installation | Usually separate | Confirm dimensions, clearances, and service requirements |
Final inspection and adjustments | Often | Confirm responsibilities in the installation agreement |
Before work begins, confirm who is responsible for cabinet assembly, demolition, disposal, trim, hardware, countertop coordination, plumbing, electrical work, and appliance hookups. Written scope definitions help prevent scheduling conflicts and unexpected charges.
Section E: Post-Installation Terms
The cabinet installation process doesn’t end when the last screw hits the stud. These finishing steps determine whether the kitchen looks and functions like it should.
Hardware Installation
Mounting pulls, knobs, and handles on doors and drawers after cabinets are set and adjusted. Hardware goes on last because doors often need repositioning during the leveling and alignment process.
Hinge Adjustment
Fine-tuning soft-close or concealed hinges so doors sit flush, align with neighboring doors, and close properly. Most modern European hinges allow three-axis adjustment (up/down, left/right, in/out) without removing the door. For more on door types and their hardware, see our cabinet door styles guide.
Punch List
A final walkthrough checklist noting any defects, gaps, scratches, misalignments, or incomplete work to be corrected. The punch list is the last quality gate before a project is considered complete. Both the installer and the client (or GC) should walk the punch list together.
Caulking / Sealing
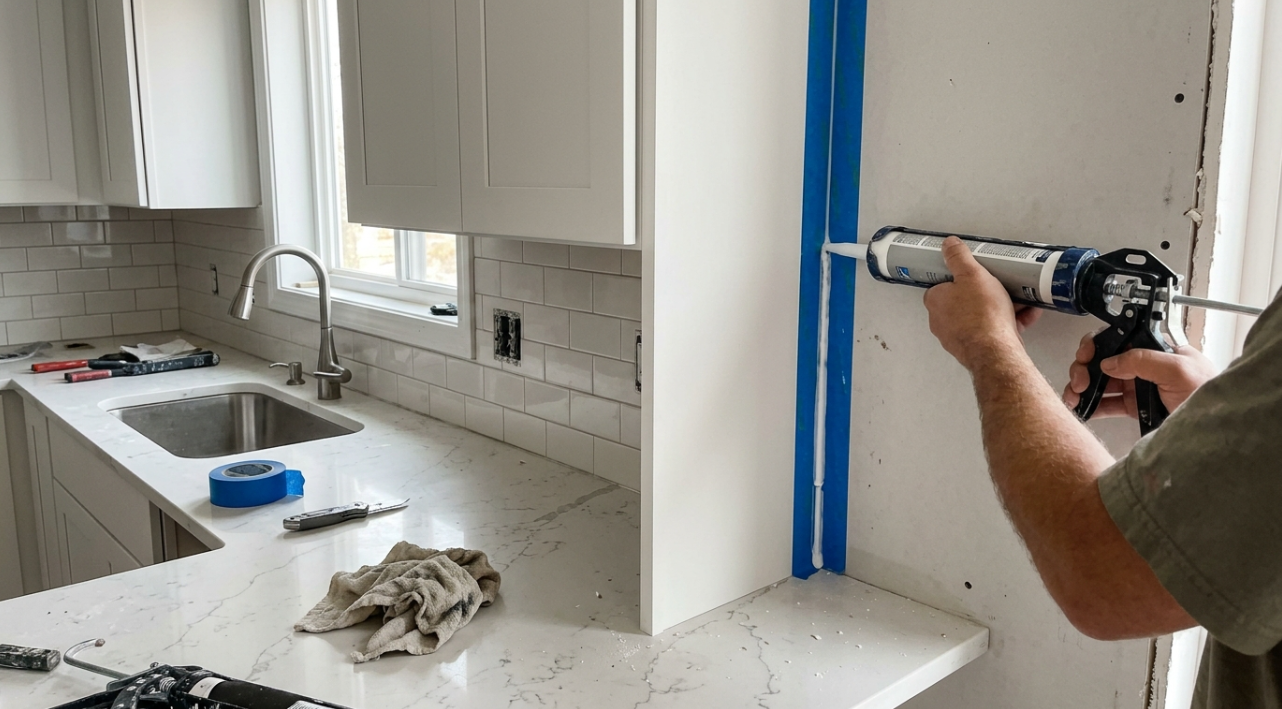
Applying caulk at joints between cabinets and walls, around sink bases, and at backsplash lines. Caulking isn’t structural; it’s cosmetic and protective. It closes micro-gaps that collect moisture, grease, and crumbs.
Appliance Integration
Confirming that dishwasher, range, and refrigerator openings match appliance specs. This is typically outside the scope of cabinet installation. Installers verify clearances, but connecting gas lines, water supply, and electrical circuits falls to plumbing and electrical trades. Setting this expectation clearly prevents scope disputes.
Section F: Framed vs. Frameless Installation Differences
The cabinet installation process changes meaningfully depending on whether you’re working with framed or frameless cabinets. Here’s a direct comparison.
Factor | Framed Cabinets | Frameless Cabinets |
|---|---|---|
Cabinet-to-cabinet screws | 2-1/2″ through face frames | 1-1/4″ max through side panels |
Precision required | More forgiving; face frame hides minor misalignments | Higher; every cabinet must be perfectly level and plumb since there’s no frame to mask errors |
Filler usage | Less frequent | More fillers recommended to manage tighter tolerances |
Usable interior space | Standard | 10 to 15% more storage due to no face frame |
Style | Traditional American (Shaker, raised panel) | European/modern (slab, slim shaker) |
Stud mounting | Required | Required |
Shimming | Required | Required |
Frameless cabinet installation requires more precision than framed cabinets. Without a face frame to hide small errors, gaps between doors become immediately visible. This is why frameless installs tend to take slightly longer per linear foot, even though the cabinets themselves often arrive with simpler box construction.
For a full comparison beyond installation, read our framed vs. frameless cabinets guide.
Section G: Timeline and Cost Quick-Reference
How long the physical cabinet installation process takes depends on the cabinet type, kitchen size, and installer experience. These benchmarks come from industry data.
Cabinet Type | Install Time (Physical) | Cost Per Linear Foot (2026) |
|---|---|---|
Stock | 2 to 3 days | |
Semi-custom | 3 to 5 days | $150 to $700 |
Custom | 5 to 7 days | $500 to $1,200+ |
RTA (add assembly time) | +1 to 2 days | Varies |
Professional kitchen cabinet installation typically takes three to five days, depending on kitchen size, materials, and customization level. Full project timelines from initial consultation to completed installation stretch much longer. Custom cabinets commonly take 12 to 20 weeks from consultation to completed installation.
Total cost averages $6,193, with most homeowners spending between $1,935 and $10,767 for a full kitchen. Hourly installer rates range from $50 to $250, though many installers charge per linear foot instead.
For more detail on how cabinet type affects lead times and scheduling, see cabinet lead times by type.
Section H: Common Mistakes Glossary
These aren’t just mistakes. They’re patterns that repeat across projects. Knowing the terminology helps you spot them before they become expensive. Around 20% of DIY cabinet installation projects experience significant errors that require costly rework, and even professional jobs aren’t immune.
Measurement Creep
Cumulative small measurement errors that compound across a cabinet run. Each individual error might be 1/16 inch, but across 15 cabinets, you’re suddenly 3/4 inch off at the end. Measurement errors account for approximately 18% of cabinet installation callbacks.
Drywall-Only Mounting
Screwing into drywall without hitting studs. This guarantees cabinet failure over time, especially for wall cabinets bearing weight. Drywall anchors are not a substitute for stud mounting on upper cabinets. Period.
Sequencing Errors
Installing countertops before cabinets are fully leveled, or templating before the base run is secured, or skipping delivery inspection entirely. Each of these time shortcuts creates rework that takes longer than doing it right the first time. Cabinet installation mistakes cost $3,000 to $12,000 to fix.
Over-Torquing
Driving screws too tight into frameless cabinet panels, cracking the material. Frameless cabinets use thinner side panels than framed cabinets, so the margin for error with screw depth and torque is smaller. Use a clutch setting on your drill.
To see more mistakes and their costs, read kitchen remodel mistakes to avoid.
Frequently Asked Questions
How long does the cabinet installation process take?
Physical installation takes 2 to 7 days depending on cabinet type and kitchen size. Stock cabinets in a small kitchen can be done in 1 to 2 days. Custom cabinets in a large kitchen may take a full week. Add 1 to 2 days if you’re assembling RTA cabinets on-site.
Should wall cabinets or base cabinets be installed first?
Most professionals install wall (upper) cabinets first. This avoids working over base cabinets to reach the wall and reduces the risk of damaging base units during upper cabinet installation.
What is the difference between installing framed and frameless cabinets?
Framed cabinets connect through face frames using 2-1/2 inch screws and are more forgiving of minor wall irregularities. Frameless cabinets connect through side panels with shorter screws (1-1/4 inch) and demand greater precision because there’s no face frame to hide misalignments.
Can I install cabinets myself?
It’s possible, but the error rate is high. About 20% of DIY cabinet installations result in significant mistakes requiring rework. Professional contractor Mike Holmes specifically lists kitchen cabinet installation as a project best left to professionals due to the structural risks of improper mounting.
What tools are essential for cabinet installation?
Professional installers on WOODWEB’s forum consistently cite a miter saw, multiple levels (6-foot, 4-foot, 2-foot, and torpedo), an impact driver, clamps, a drill with clutch settings, and a cabinet jack or “third hand” device as the core toolkit.
How much does cabinet installation cost in 2026?
The national average is about $6,193, with most projects falling between $1,935 and $10,767. Per linear foot, expect $100 to $400 for stock, $150 to $700 for semi-custom, and $500 to $1,200+ for custom cabinets. Installer hourly rates range from $50 to $250.
What is a punch list in cabinet installation?
A punch list is the final walkthrough checklist created after cabinets are installed. It documents any defects, misalignments, scratches, gaps, or unfinished items that the installer needs to correct before the project is considered complete.
Does cabinet installation include plumbing and electrical work?
No. Cabinet installation scope typically covers mounting, leveling, connecting, and adjusting the cabinets themselves. Plumbing, electrical, and appliance hookups are separate trades that need to be coordinated by the general contractor or homeowner.
Ready to align your cabinet sourcing with your installation timeline? Visit a Krafter’s Land showroom to see framed, frameless, and slim shaker options in person, or request a free design and quote to get your next project moving.