
TLDR
Measuring kitchen cabinets starts with measuring the room itself: wall lengths, ceiling heights, windows, doors, utilities, and appliance locations, all recorded in inches. Measure every wall at three heights and use the smallest number for planning. Standard cabinet sizes rarely match real wall dimensions perfectly, so fillers and scribes are normal parts of a well-planned kitchen. Rough measurements are valuable for starting a design conversation, but final field verification should happen before ordering.
Quick Answer: How Do You Measure Kitchen Cabinets?
To measure kitchen cabinets correctly, first measure the room rather than the cabinets. Record every wall length at the floor, countertop, and ceiling using inches only. Then measure ceiling height, windows, doors, plumbing, electrical outlets, appliances, and all fixed obstacles. If you’re replacing cabinet doors only, measure each cabinet opening and determine the door overlay type. Always verify measurements before ordering because walls are rarely perfectly square.
What “Measure Kitchen Cabinets” Actually Means
Here’s the confusion most people hit immediately: “measure kitchen cabinets” can mean two different things. It can mean measuring the room where cabinets will go, or measuring existing cabinet boxes for reference or replacement.
For a full kitchen remodel, you measure the room first. Wall lengths, ceiling heights, windows, doors, plumbing, gas lines, electrical outlets, appliances, and every obstruction between countertop and ceiling. The existing cabinets are secondary. A designer needs the room’s real constraints, not just what’s already bolted to the wall.
For a simple door-and-drawer replacement (keeping the same cabinet boxes), you measure each cabinet opening and determine the overlay type.
Either way, a half-inch error can force costly changes. According to the 2025 Cost vs. Value report, even a minor midrange kitchen remodel averages $28,458 in job costs. Getting measurements right protects that investment.
Rough measurements are excellent for starting a design conversation or requesting a quote. Final field verification should always happen before anyone places a cabinet order.
Request a free design quote from Krafter’s Land, and a professional can help turn your rough measurements into a 3D rendering.
Cabinet Measurement Glossary
This glossary covers the terms you’ll encounter when measuring kitchen cabinets, talking to a designer, or reading a cabinet spec sheet. Understanding these words prevents ordering mistakes and miscommunication.
Width. The left-to-right measurement of a cabinet, wall, or opening. Measure openings at multiple points because walls can bow or lean, making the top measurement different from the bottom.
Height. The floor-to-ceiling, floor-to-soffit, or floor-to-window measurement. Always measure ceiling height in multiple locations. Lowe’s recommends checking several spots including corners and the room center because ceilings are rarely perfectly flat.
Depth. The front-to-back measurement. Cabinet box depth, countertop depth, and appliance depth are three separate numbers. A standard 24-inch base cabinet box becomes roughly 25.5 inches at the countertop because of the 1.5-inch front overhang.
Cabinet run. A row of cabinets along one wall. The total cabinet run is almost never exactly the same as the wall length because fillers, end panels, and appliance spaces absorb the difference.
Opening. Any space for a window, door, appliance, or cabinet door/drawer. Measure openings from outside trim edge to outside trim edge when planning cabinet placement.
Centerline. The center location of a sink, window, range, drain, or utility line, measured from a fixed wall or corner. Designers use centerlines to align sinks under windows and locate plumbing connections.
Fixed point. A reference that won’t move, such as a wall corner, window edge, drain, gas stub, or structural post. Always measure utility locations from fixed corners, not from movable appliances.
Soffit. A lowered ceiling section, often above upper cabinets. When soffits are present, you need both floor-to-ceiling and floor-to-soffit measurements.
Filler strip. A matching material strip that fills extra space between cabinets and walls or corners. Fillers are not a mistake. They’re how standard cabinet widths meet real walls.
Scribe strip. A filler or trim piece cut to match an uneven wall surface. While a filler is typically straight, a scribe is shaped to follow the wall’s contour.
Toe kick. The recessed space at the bottom of base cabinets, usually about 3 inches deep, that lets you stand close to the counter without hitting your toes.
Countertop overhang. The countertop edge extending past the cabinet face. Standard overhang is about 1.5 inches at the front and 0.5 inches on finished sides. This matters when calculating aisle width. For more on countertop materials and thickness, compare quartz and marble.
Overlay. How much a cabinet door covers the face frame when closed. Full overlay covers almost the entire frame. Partial overlay leaves visible frame between doors. Inset doors sit flush inside the frame opening. This distinction matters most when ordering replacement doors. Understanding overlay is easier with context on frameless cabinet construction versus framed cabinet design.
Reveal. The visible gap or margin between doors, drawers, or fillers. Reveals should look intentional. Practitioners on LinkedIn emphasize that small on-site variations can create unexpected gaps unless installation tolerances are accounted for during design.
Plumb. Perfectly vertical. Walls lean. Cabinets should still be installed plumb, with the gap handled by shims or scribes.
Level. Perfectly horizontal. Base cabinets must be level for countertops to sit flat and for doors and drawers to operate correctly. Fine Homebuilding notes that if cabinets aren’t level and plumb, counter installation becomes nearly impossible.
Square. A true 90-degree corner. Most rooms are not perfectly square, and checking this early prevents problems during installation.
Appliance clearance. The extra space an appliance needs for ventilation, handles, door swing, and safe operation. This varies by brand and model.
Measuring a Kitchen vs Measuring Existing Cabinets
Measuring the Room | Measuring Existing Cabinets |
|---|---|
Used for remodels | Used for replacement doors |
Measures walls | Measures cabinet boxes |
Includes utilities | Includes overlay |
Determines layout | Determines replacement size |
Required for designers | Required for ordering doors |
How Long Does It Take to Measure a Kitchen?
Kitchen Size | Approximate Time |
|---|---|
Small | 30–45 minutes |
Medium | 45–75 minutes |
Large | 1–2 hours |
Taking photographs and double-checking measurements usually adds another 20–30 minutes but can prevent costly ordering mistakes.
Decide What You’re Measuring For
Before pulling out a tape measure, identify which job you’re doing. The measurements change depending on the scope.
Same layout, new cabinets. Measure the room and the existing cabinets. The room dimensions matter more. Existing cabinet sizes are useful reference, but a new cabinet line may use different width increments.
New layout. Measure the room, all fixed points, utility locations, and appliance specs. Don’t rely on old cabinet dimensions at all because the old layout is irrelevant if you’re changing it.
Door and drawer replacement only. Measure each cabinet frame opening, determine overlay, and note hinge type. The room dimensions are less important since the boxes stay in place.
Kitchen Cabinet Kings explicitly separates these three scenarios in their guide, noting that both keeping a footprint and designing a new layout start with accurate wall and ceiling measurements. The strongest advice here: do not start by measuring only the old cabinet boxes unless you’re doing a simple same-layout swap. Designers need the room.
Tools for Measuring Kitchen Cabinets
Keep it simple:
25-foot steel tape measure. Not a cloth tape, not a 12-foot tape. Steel, 25 feet.
Pencil and eraser. You will make corrections.
Graph paper or printed grid. Each square equals 6 or 12 inches.
Level. A 4-foot level works well for checking walls and floors.
Step stool or short ladder. You need to reach ceiling height.
Smartphone. For photos of every wall, close-ups of obstructions, and a backup of your sketch.
Optional: laser measure. Good for rough room dimensions, but use the tape for final critical numbers.
Two rules that prevent the most common ordering mistakes:
Record everything in inches. Not feet-and-inches. A wall that’s “10 feet 3 inches” should be written as “123 inches.” Cabinet dimensions are ordered in inches, and converting between formats introduces errors.
Measure to the nearest 1/8 inch for room measurements. For replacement cabinet doors, measure to 1/16 inch. The tighter the tolerance, the better the fit.
Step-by-Step: How to Measure for Kitchen Cabinets
This process follows a “room first, cabinets second” order. You start with the things that can’t change (walls, windows, plumbing) and work toward the things a designer can adjust (cabinet sizes, filler placement, layout).
Step 1: Draw a Simple Kitchen Sketch
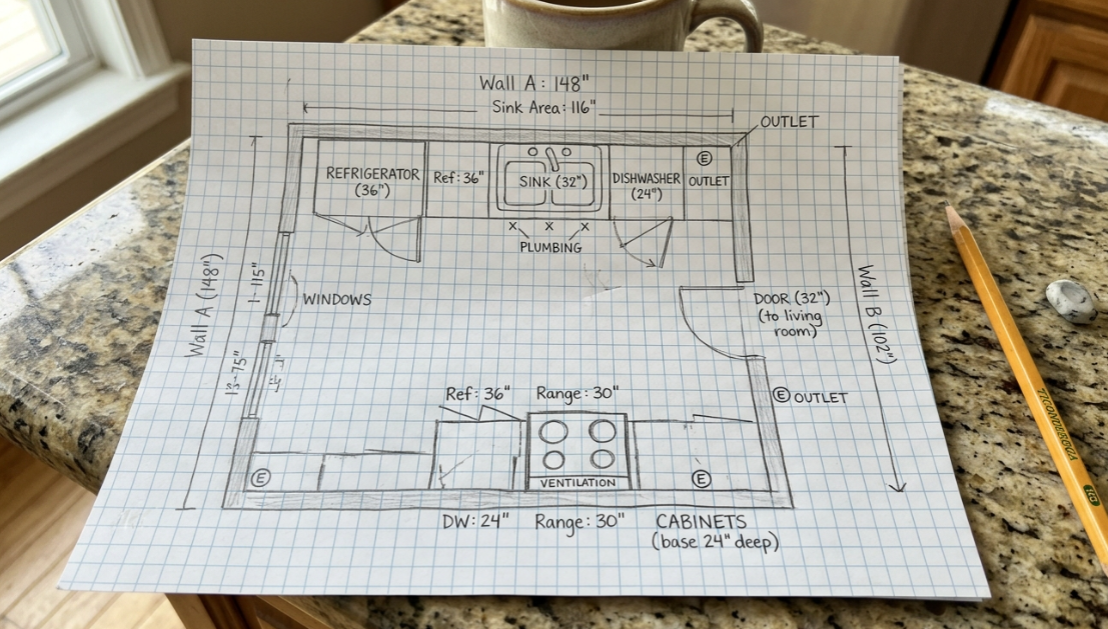
Draw the room from a top-down view. It doesn’t need to be artistic. Label each wall (A, B, C, D) and mark every feature: doors, windows, appliances, sink, range, refrigerator, dishwasher, island, vents, radiators, posts, soffits, and utility connections.
Use a simple symbol key:
W = window
D = door
DW = dishwasher
R = range
REF = refrigerator
S = sink
G = gas line
E = electrical outlet
P = plumbing
V = vent
SOF = soffit
Write every measurement directly on this sketch next to the feature it describes. Photograph your sketch when finished.
Step 2: Measure Full Wall Lengths
Measure each wall from corner to corner. Ignore appliances, fixtures, and windows during this first pass. Just get the total wall length.
Then measure each wall at three heights:
Near the floor (about 6 inches up)
At countertop height (about 36 inches)
Near the ceiling
Walls are rarely perfectly straight or parallel. A wall might be 120 inches at the floor and 119 3/8 inches near the ceiling. Use the smallest reliable measurement for cabinet planning, not the most convenient one. If a tall pantry cabinet needs to fit that wall, the ceiling-level number is the one that matters.
Step 3: Check Whether Walls Are Square, Plumb, and Level
Do not assume corners are 90 degrees or that the floor is flat. Use the 3-4-5 method: from a corner, measure 3 feet along one wall and 4 feet along the other. If the diagonal between those two points is exactly 5 feet, the corner is square. If it’s off, note by how much.
Check the floor with your level. Find the high spot, because that’s where the first cabinet gets set. Every other cabinet in the run is shimmed up to match.
Practitioners on DIY forums and Reddit consistently report that factory cabinet boxes rarely fit perfectly against real walls and floors. The standard field approach is to shim, level, and scribe rather than force a straight cabinet into a crooked wall.
Step 4: Measure Ceiling Heights, Soffits, and Windows
Measure floor-to-ceiling height at each corner and the middle of each wall. If your kitchen has soffits, measure floor-to-soffit as well.
For windows, record these numbers:
Floor to windowsill
Windowsill to top of window
Top of window to ceiling
Width from outside trim edge to outside trim edge
Distance from nearest corner to outside trim edge
Centerline of the window (important if a sink will be centered underneath)
Step 5: Measure Doors, Openings, and Trim
Measure doors and pass-throughs from the outside of the trim to the outside of the trim on the other side. Also measure from the nearest wall corner to the trim edge. Note the door’s swing direction.
Trim consumes space. A doorway casing that’s 3 inches wide on each side eats 6 inches of cabinet-planning space on that wall.
Step 6: Mark Plumbing, Electrical, Gas, and Vents
Measure from a fixed corner to the centerline of every utility connection: water supply, drain, gas line, range hookup, dishwasher connection, electrical outlets, light switches, hood vent, and HVAC vents. Record outlet heights from the floor.
A critical warning from practitioners on LinkedIn: utilities can change after your initial measurement. Electricians and plumbers may relocate service lines during a remodel, creating pipe conflicts or duct misalignment. If the layout is changing, plan on re-measuring after demolition or after utilities are exposed and confirmed.
Step 7: Measure Appliances and Appliance Clearances
Record the size of each appliance and the space it needs to function:
Refrigerator: width, height, closed depth, open depth, hinge height, handle projection, and rear ventilation gap
Range: width, height to cooktop, depth, open-door clearance
Dishwasher: opening height, width, depth, door-open depth
Microwave/hood: size and vent route
Wall oven: opening height, width, and depth
Home Depot’s appliance guide warns never to assume that all brands within the same category share identical dimensions. Include protrusions like feet and hinges, and measure open depth for usability.
NKBA planning guidelines also specify clearance requirements. For example, a dishwasher’s nearest edge should be within 36 inches of the nearest cleanup sink edge, with at least 21 inches of standing space when the dishwasher door is open at a right angle.
Pick or at least shortlist your appliances before finalizing a cabinet order. Practitioners on Reddit’s r/kitchenremodel consistently advise finalizing appliance sizes before cabinet ordering because refrigerator depth, door swing, and dishwasher dimensions can shift cabinet choices by inches.
When you’re ready to start matching your measurements with available styles and sizes, explore cabinet product categories.
Recommended Order for Measuring a Kitchen
Measure First | Why It Matters |
|---|---|
Room walls | Defines the cabinet layout |
Ceiling height | Determines cabinet height |
Windows | Affects upper cabinet placement |
Doors | Prevents cabinet interference |
Utilities | Fixes sink, range, and dishwasher positions |
Appliances | Determines cabinet openings |
Existing cabinets | Useful only for reference |
Cabinet doors | Needed only for door replacement |
Standard Kitchen Cabinet Dimensions
These are common dimensions, not universal rules. Every cabinet manufacturer has its own spec sheet, and custom or semi-custom lines can differ from stock cabinets. Always check your chosen line’s actual specifications.
Base cabinets. Typically 34.5 inches high and 24 inches deep (box only). Adding a 1.5-inch countertop brings the working height to about 36 inches. The toe kick is usually a 3-inch recessed inset at the bottom. Home Outlet’s guide covers these standards well.
Wall cabinets (uppers). Commonly 12 inches deep. Heights vary: 30, 36, or 42 inches are typical. The bottom of the upper cabinet usually sits 18 to 20 inches above the countertop surface. Some cabinet lines use different depths, so confirm with your supplier.
Tall and pantry cabinets. Common heights are 84, 90, or 96 inches, with a depth of about 24 inches. Tall units make out-of-level floors and ceiling variation more visible, so use the shortest ceiling measurement in your planning.
Countertop depth and overhang. A standard countertop is about 25.5 inches deep (24-inch base cabinet plus 1.5-inch front overhang). Finished sides typically get a 0.5-inch overhang. Always calculate aisle width from the finished countertop edge, not the cabinet box.
Cabinet widths. Stock cabinet systems use standard width increments, typically in 3-inch steps. But as practitioners on Reddit’s r/HomeImprovement explain, when a wall run isn’t evenly divisible by these standard widths, the leftover space is handled with filler. That’s normal, not a planning failure.
Box depth versus installed depth. The number printed in a catalog may not equal the installed footprint. A 24-inch base cabinet box can become roughly 24 7/8 inches once door thickness and bumpers are added. Then the countertop overhang adds more. Factor in these projections when calculating aisle clearances and appliance fits.
For contractors, remodelers, designers, and builders working with cabinet product lines, register as a trade partner with Krafter’s Land.
Common Kitchen Cabinet Measurement Standards
Item | Typical Measurement |
|---|---|
Base cabinet height | 34.5 inches |
Finished countertop height | 36 inches |
Base cabinet depth | 24 inches |
Countertop depth | 25.5 inches |
Wall cabinet depth | 12 inches |
Toe kick height | 3–4 inches |
Countertop overhang | 1.5 inches |
Space between countertop and upper cabinets | 18 inches |
Pantry cabinet depth | 24 inches |
Fillers, Scribes, and Out-of-Square Walls
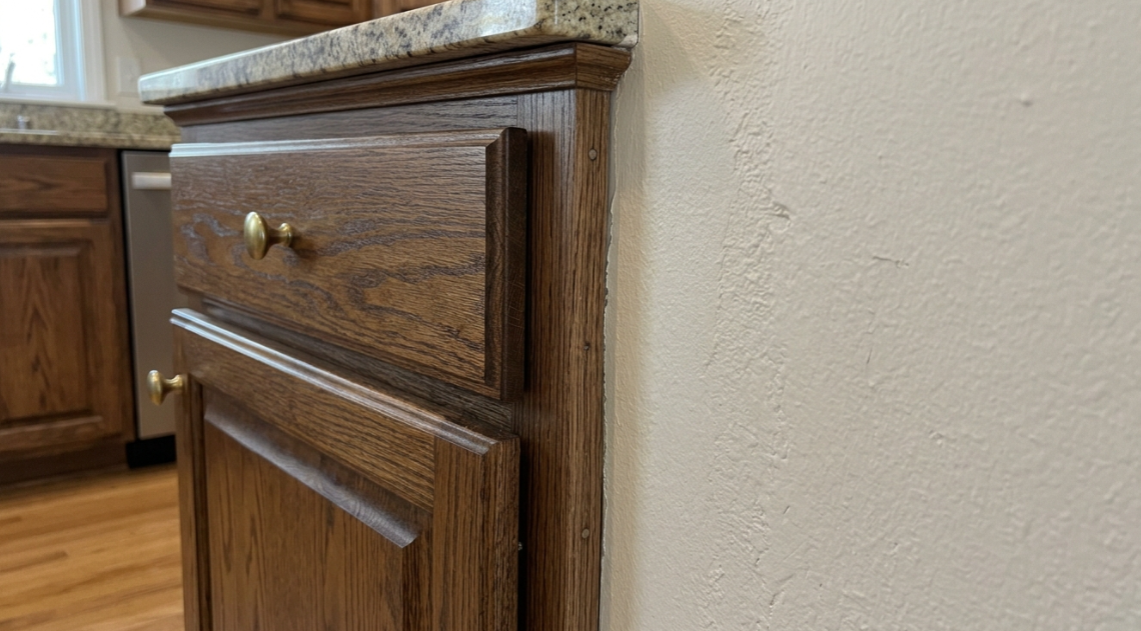
This is where most generic measurement guides fall short and where most real-world problems show up. Knowing how to measure kitchen cabinets is only half the job. Knowing what to do with the leftover space is the other half.
Why Fillers Are Normal
Standard cabinet boxes come in fixed width increments. Real walls don’t. A 121-inch wall won’t be perfectly filled by any combination of standard-width cabinets without some space left over.
That leftover space gets a filler strip: a piece of matching material that bridges the gap between the last cabinet and the wall. A ranking Reddit thread on r/HomeImprovement addresses this exact confusion, with experienced commenters explaining that prefab cabinets nearly always require filler pieces when wall measurements don’t divide cleanly into available sizes.
Both Kitchen Cabinet Kings and MKE Cabinetry recommend leaving about 1.5 inches on each side of a cabinet run for fillers. This isn’t wasted space. Fillers also prevent doors and drawers from hitting adjacent walls or appliances when opened.
Here’s a practical example. If a wall is 121 inches and your selected cabinets total 118 inches, the extra 3 inches might be split into two 1.5-inch fillers (one at each end), placed entirely on one side, or distributed by a designer to optimize door alignment and sightlines.
When to Scribe Instead of Fill
A filler strip is straight. A scribe is custom-cut to follow an uneven wall surface.
If a wall bows in the middle or leans from top to bottom, a straight filler will leave a visible gap at some point. Scribing means measuring the gap at the top, middle, and bottom, then cutting the filler to match the wall contour.
In r/cabinetry, one installer with 15 years of commercial experience described this as standard practice: measure the gap at three points, transfer those measurements to the filler, and cut to fit. This is a field skill, not a measurement failure.
Cabinets Stay Square, the Walls Don’t
The most important principle in this section: cabinets should be installed plumb, level, and square relative to each other, even when the walls and floors aren’t. You shim, scribe, and fill to bridge the difference. Forcing a square cabinet box to conform to a crooked wall creates problems with countertop fit and door operation.
Fine Homebuilding’s installation guidance says every project begins by checking room conditions, not by assuming they’re right. Measure reality before designing the ideal plan.
How to Measure Existing Cabinets
If you’re documenting existing cabinets for a same-layout replacement or as reference, measure each box separately:
Width: left edge to right edge of the cabinet box or face frame
Height: bottom to top of the cabinet box, excluding countertop
Depth: back wall to front of cabinet box, then separately record door projection and countertop overhang
Location: distance from the nearest wall corner to the cabinet’s start and end points
Door and drawer clearance: note whether anything hits walls, appliances, or adjacent handles
If the new layout changes, existing cabinet measurements are reference only. The room and fixed utilities matter more.
How to Measure for Replacement Cabinet Doors
If you’re keeping the cabinet boxes and only replacing doors and drawer fronts, this is a precision job.
Measure the cabinet frame opening (the rectangular hole in the face frame), not the existing door. Measure width and height to the nearest 1/16 inch.
Determine overlay type. Full overlay covers almost the entire frame. Partial overlay leaves visible frame between doors. Inset doors sit flush inside the opening.
Add overlay to the opening measurement. For example, a 15-inch-wide by 30-inch-high opening with 1/2-inch overlay on all sides becomes a 16-inch by 31-inch door.
Measure the existing door as a double-check. The opening is the primary measurement, but comparing it against the old door catches errors.
Note hinge type and bore pattern. Your new doors need to match the existing hinge setup, or you’ll need new hinges too.
Kitchen Cabinet Kings provides a detailed overlay walkthrough in their measurement guide that covers full overlay, partial overlay, and inset configurations.
Common Kitchen Cabinet Measurement Mistakes
These are the errors that cause the most expensive problems.
Measuring at only one height. Walls lean and bow. A wall can be wider at the floor than at the ceiling. Measure each wall at three heights and use the smallest number.
Forgetting fillers. Cabinets shoved directly against walls or into corners without filler can prevent doors and drawers from opening fully. Plan for 1.5 inches of filler where a cabinet run ends at a wall.
Ignoring appliance handles and door swing. A refrigerator might fit its opening perfectly when closed, but the handle, hinge, or open door extends past the cabinet face. Always measure open depth and handle projection.
Measuring cabinet boxes but not countertop overhang. A 24-inch cabinet becomes roughly 25.5 inches at the countertop. Aisle widths and appliance clearances should be calculated from the finished countertop edge.
Ignoring utilities. Plumbing, gas, drains, outlets, and vents can force layout changes that no amount of cabinet rearranging solves.
Assuming all appliances are the same size. A “36-inch refrigerator” from one brand is not the same as a “36-inch refrigerator” from another.
Skipping level, plumb, and square checks. Cabinets that aren’t level can make countertop installation impossible and cause doors to swing open or closed on their own.
Not taking photos. Designers working from a sketch alone can easily misunderstand an obstruction, a vent location, or a wall condition. Take photos of every wall plus close-ups of obstructions. More photos than you think you need.
Kitchen Cabinet Measuring Mistakes at a Glance
Mistake | Result |
|---|---|
Measuring one wall height only | Cabinets may not fit |
Ignoring fillers | Doors hit walls |
Forgetting appliance handles | Poor clearances |
Measuring in feet instead of inches | Ordering mistakes |
Skipping ceiling measurements | Tall cabinets may not fit |
Forgetting soffits | Upper cabinets become too tall |
Ignoring countertop overhang | Incorrect aisle widths |
Not photographing utilities | Design revisions later |
What to Send to a Cabinet Designer or Contractor
Once you’ve finished measuring kitchen cabinets, compile everything into a single package. Here’s what a designer or contractor needs to produce an accurate layout:
Sketch with labeled walls (A, B, C, D)
Full wall measurements at three heights
Ceiling and soffit heights at multiple points
Window and door dimensions including trim
Appliance specs or model numbers
Photos of every wall, utility, and obstacle
Utility centerlines measured from fixed corners
Notes about wall, floor, or ceiling problems
Desired layout changes or must-haves
Whether existing cabinets are framed or frameless, if known
This package gives a designer enough information to produce a preliminary layout and 3D rendering. It won’t replace a final field measurement (which should happen before ordering), but it gets the conversation started and prevents wasted showroom visits.
See how kitchen cabinet measurements become finished rooms in the completed projects gallery.
Expert Tip
Even professional kitchen designers rarely order cabinets from homeowner measurements alone. Rough measurements are excellent for planning layouts and obtaining estimates, but final field verification is standard practice because walls, floors, and utility locations often vary more than expected.
Bringing It All Together
Measuring kitchen cabinets is more than recording box sizes. It’s documenting the room, the fixed constraints, the appliance requirements, and the real-world gaps that fillers and scribes solve. A set of rough measurements taken carefully and recorded clearly is the single most useful thing you can bring to a design conversation.
For homeowners, these measurements are the starting point for a free design, a quote, and a 3D rendering. For professionals working with clients, accurate measurement notes speed up the entire planning and quoting process. And because cabinet ordering depends on real field conditions, confirm final measurements with a licensed contractor or installer before placing any order.
Contact Krafter’s Land to turn your rough measurements into a professional cabinet design through an authorized retailer or licensed contractor.
Frequently Asked Questions
Do I measure cabinets or the room first?
Measure the room first. Wall lengths, ceiling heights, windows, doors, utilities, and appliances are the constraints a designer needs. Existing cabinet measurements are useful for reference but secondary to the room itself.
How accurate do kitchen cabinet measurements need to be?
Room measurements should be accurate to the nearest 1/8 inch. Replacement cabinet door measurements need 1/16-inch precision. The tighter the tolerance, the fewer problems during installation.
Should I measure in inches or feet?
Inches only. Cabinet dimensions are specified and ordered in inches. Converting between feet-and-inches and straight inches introduces errors that can lead to wrong orders.
What is a filler strip, and why do I need one?
A filler strip is a piece of matching cabinet material that fills the space between the last cabinet in a run and the wall. Standard cabinet widths rarely add up to exact wall lengths, so fillers bridge the difference. They also prevent doors and drawers from hitting adjacent walls when opened.
How do I measure a kitchen that isn’t square?
Use the 3-4-5 method to check corners. Measure walls at three heights (floor, counter, ceiling) and use the smallest number. Note any deviation from plumb, level, or square on your sketch so the designer can plan fillers and scribes accordingly.
Should I pick appliances before ordering cabinets?
Yes. Appliance dimensions, handle projections, door swings, and ventilation requirements directly affect cabinet sizing. Finalize appliance choices, or at least narrow the shortlist, before placing a cabinet order.
Can I measure myself, or do I need a professional?
You can take useful rough measurements yourself using the steps in this guide. Those measurements are valuable for getting a design started, receiving a quote, or having a productive showroom conversation. But final field measurements should be verified by a qualified installer or contractor before ordering.
What is the difference between a filler and a scribe?
A filler strip is straight and fills a gap of consistent width. A scribe strip is custom-cut to follow the contour of an uneven wall. If the wall bows or leans, a straight filler would leave a visible gap, so the piece is scribed (shaped) to match the wall surface.